PetaLinux常用操作

本文最后更新于:2023年6月29日 下午

安装petalinux2022.2

  1. 安装依赖包
1
sudo apt-get install iproute2 gawk python3 python build-essential gcc git make net-tools libncurses5-dev tftpd zlib1g-dev libssl-dev flex bison libselinux1 gnupg wget git-core diffstat chrpath socat xterm autoconf libtool tar unzip texinfo zlib1g-dev gcc-multilib automake zlib1g:i386 screen pax gzip cpio python3-pip python3-pexpect xz-utils debianutils iputils-ping python3-git python3-jinja2 libegl1-mesa libsdl1.2-dev pylint3 libtinfo5
  1. 更改文件夹权限
1
2
sudo mkdir petalinux2022.2
sudo chmod 777 petalinux2022 ./
  1. 下载petalinux2022.2安装包

地址:Downloads (xilinx.com)

  1. 更改默认shell
1
bash
  1. 安装
1
./petalinux-v2022.2-10141622-installer.run -d ./petalinux2022.2

安装过程需要同意许可信息,输入三次y。

qemu启动

参考《ug1144-petalinux-tools-reference-guide.pdf》

1. 生成.BIN镜象

粘贴相应的.bitplnx-proj-root/images/linux/

1
2
cd <plnx-proj-root>
petalinux-package --boot --format BIN --fsbl --u-boot --pmufw --fpga ./images/linux/design_1_wrapper.bit --force

2. 封装预构建镜像

1
petalinux-package --prebuilt --fpga ./images/linux/design_1_wrapper.bit --force

3. 启动qemu

1
petalinux-boot --qemu --prebuilt 3

注意:若使用petalinux2021启动qemu需要在xilinx官网下载某个版本的.bsp,将其中的pmu_rom_qemu_sha3.elf 拷贝到<plnx-proj-root>/pre-built/linux/images下。

1
2
3
4
5
6
7
8
9
10
11
12
13
14
15
16
17
18
19
20
21
22
23
eddy@eddy:~/code/test$ petalinux-boot --qemu --prebuilt 3
[INFO] Sourcing buildtools
INFO: No DTB has been specified, use the default one "/home/eddy/code/test/pre-built/linux/images/system.dtb".
INFO: Starting microblaze QEMU
INFO: Starting the above QEMU command in the background
INFO: qemu-system-microblazeel -M microblaze-fdt -serial mon:stdio -serial /dev/null -display none -kernel /home/eddy/code/test/pre-built/linux/images/pmu_rom_qemu_sha3.elf -device loader,file=/home/eddy/code/test/pre-built/linux/images/pmufw.elf -hw-dtb /home/eddy/code/test/pre-built/linux/images/zynqmp-qemu-multiarch-pmu.dtb -machine-path /tmp/tmp.zRXyRZk5bx -device loader,addr=0xfd1a0074,data=0x1011003,data-len=4 -device loader,addr=0xfd1a007C,data=0x1010f03,data-len=4
qemu-system-microblazeel: Failed to connect socket /tmp/tmp.zRXyRZk5bx/qemu-rport-_pmu@0: No such file or directory
qemu-system-microblazeel: info: QEMU waiting for connection on: disconnected:unix:/tmp/tmp.zRXyRZk5bx/qemu-rport-_pmu@0,server
INFO: TCP PORT is free
INFO: Starting aarch64 QEMU
INFO: qemu-system-aarch64 -M arm-generic-fdt -serial /dev/null -serial mon:stdio -display none -device loader,file=/home/eddy/code/test/pre-built/linux/images/bl31.elf,cpu-num=0 -device loader,file=/home/eddy/code/test/pre-built/linux/images/rootfs.cpio.gz.u-boot,addr=0x04000000,force-raw -device loader,file=/home/eddy/code/test/pre-built/linux/images/u-boot.elf -device loader,file=/home/eddy/code/test/pre-built/linux/images/Image,addr=0x00200000,force-raw -device loader,file=/home/eddy/code/test/pre-built/linux/images/system.dtb,addr=0x00100000,force-raw -device loader,file=/home/eddy/code/test/pre-built/linux/images/boot.scr,addr=0x20000000,force-raw -gdb tcp::9000 -net nic,netdev=eth0 -netdev user,id=eth0,tftp=/tftpboot -net nic -net nic -net nic -net nic -hw-dtb /home/eddy/code/test/pre-built/linux/images/zynqmp-qemu-multiarch-arm.dtb -machine-path /tmp/tmp.zRXyRZk5bx -global xlnx,zynqmp-boot.cpu-num=0 -global xlnx,zynqmp-boot.use-pmufw=true -m 4G
QEMU 5.1.0 monitor - type 'help' for more information
(qemu) qemu-system-aarch64: warning: hub port hub0port3 has no peer
qemu-system-aarch64: warning: hub 0 is not connected to host network
qemu-system-aarch64: warning: netdev hub0port3 has no peer
qemu-system-aarch64: warning: requested NIC (__org.qemu.net4, model unspecified) was not created (not supported by this machine?)
PMU Firmware 2021.1 Jun 6 2021 07:07:32
PMU_ROM Version: xpbr-v8.1.0-0
NOTICE: ATF running on XCZUUNKN/QEMU v4/RTL0.0 at 0xfffea000
NOTICE: BL31: v2.4(release):xlnx_rebase_v2.4_2021.1_update1
NOTICE: BL31: Built : 08:27:07, Apr 28 2021

打包BSP

1
petalinux-package --bsp -p 2021-25-mcdma/ --hwsource eth_25g_2021-3-8/ -o 2021-25-mcdma.bsp --force

psu_init 是FSBL中的一个函数,用于初始化PS端

petalinux qemu 调试linux内核

  1. 启动qemu

    1
    petalinux-boot --qemu --prebuilt 3
  2. 进入<plnx-proj-root>image/linux文件夹

  3. 进行gdb调试

    1
    petalinux-util --gdb vmlinux

gdb 调试 Linux 内核网络源码(附视频) (wenfh2020.com)

调试步骤[6]

可参考《ug1144-petalinux-tools-reference-guide.pdf》 Debugging节

  1. 启动qemu

  2. 执行gdb调试命令

1
petalinux-util --gdb vmlinux

创建zynqMP自定义工程[1]

创建.xsa文件

使用Vivado创建工程并生成xsa文件

创建自定义工程

1
petalinux-create -t project --template zynqMP --name <name>

工程配置

1
2
3
4
5
6
7
8
9
10
11
12
13
14
$ cd <plnx-proj-root>
petalinux-config --get-hw-description <name>.xsa

petalinux-config
#默认配置

petalinux-config -c kernel
#配置内核

petalinux-config -c rootfs
#配置文件系统

petalinux-config -c u-boot
#配置u-boot

对构建的工程进行实际的配置

配置启动地址信息

进入u-boot Configuration ---> u-boot script configuration --->根据启动方式以及各文件大小进行配置。

image-20230516202016744

工程编译

1
2
3
4
5
6
7
8
9
10
11
12
13
14
15
16
17
18
19
20
21
22
23
24
25
26
cd <plnx-proj-root>
petalinux-build
#整个工程编译,编译后生成image.ub

petalinux-build -c kernel
#编译内核

petalinux-build -c rootfs
#编译文件系统

petalinux-build -c u-boot
#编译u-boot

petalinux-build -x distclean
#清空编译后产生的临时文件和下载的sstate cache文件

petalinux-build -x mrproper
#清空所有的临时文件,<PROJECT>/images/, <PROJECT>/build/ and <PROJECT>/components/plnx_workspace/ directories


"petalinux-build -x package" 是 PetaLinux 工具的命令,它用于构建 PetaLinux 项目。PetaLinux 是一个用于嵌入式设备的 Linux 发行版,由 Xilinx 公司开发。PetaLinux 提供了一些工具和命令,用于构建、调试和定制 Linux 系统。其中 "petalinux-build" 就是用于构建 PetaLinux 项目的命令,而 "-x package" 则表示只构建指定的软件包。

#打包到image.ub

petalinux-build -c mymodule -x do_cleansstate
#清除用户模块

离线编译工程配置

下载离线包Downloads (xilinx.com)

image-20230516163136806

下载上述两个压缩包。

当前环境为 petalinux2021.1 设备为250soc (xilinx )

1
2
$ cd <plnx-proj-root>
petalinux-config --get-hw-description <name>.xsa

进入Linux Components Selection —> u-boot(u-boot-xlinx)以及linux-kernel均选择ext-local-src,配置离线编译包。

image-20230516155842635

image-20230516160123087

image-20230516160222677

进入Subsystem AUTO Hardware Settings ---> Serial Settings ---> 将串口均选择为psu_uart_1

image-20230516160245000

原因是根据.xsa生成的设备树中将uart1配到了设备的serial0

image-20230516160555650

若要使用qemu启动,此步骤可空过,若使用板子启动需要将这里的INITRAMFS/INITRD Image name更改为如下petalinux-image-minimal,若更改后使用qemu启动会出现ERROR /dev的错误。

image-20230516160724405

配置离线包

进入Yocto Settings ---> Add pre-mirror url ---> 更改为下载的离线包的位置

image-20230516161519634

注意:这里需要在最前面加上file://

配置sstate

image-20230516161650342

其他配置可根据情况修改。推出前需保存。

注意:若中途需要远程下载相应的app或者包文件,需要是能开启Enable Network sstate feeds。防止编译报错。

若存在apppackages,需要进入文件系统配置中添加相应的选项。

1
petalinux-config -c rootfs

image-20230516161900744

进入build/conf编辑local.conf

image-20230516163537432

配置完成后若想加app或者packages,需要在project-spec对应的mate-user中添加自己的文件,或有现成的mate-user,直接将此文件夹进行替换即可。

配置完成后即可进行编译。

创建自定义模块

1
2
3
4
$ cd <plnx-proj-root>
petalinux-create -t modules --name <user-module-name> --enable

petalinux-create -t apps --template c --name myapp --enable

JTAG烧写

.tcl文件

1
2
3
4
5
6
7
8
9
10
11
12
13
14
15
16
17
18
19
20
21
22
23
24
25
26
27
28
29
30
31
#connect
fpga -no-revision-check -f design_1_wrapper.bit
after 2000
targets -set -filter {name =~ "PSU"}
mask_write 0xFFCA0038 0x1C0 0x1C0
after 500
#Load and run PMUFW
targets -set -filter {name =~ "MicroBlaze PMU"}
dow pmu-firmware-250soc-zynqmp.elf
con
after 500
#Reset A53, load and run FSBL
targets -set -filter {name =~ "PS8" || name =~ "PSU"}
mwr 0xffff0000 0x14000000;mask_write 0xFD1A0104 0x501 0x0
targets -set -filter {name =~ "Cortex-A53 #0"}
source psu_init.tcl
dow fsbl-250soc-zynqmp.elf
con
#Give FSBL time to run
after 5000
stop
psu_ps_pl_isolation_removal; psu_ps_pl_reset_config
after 500
dow u-boot.elf
after 500
dow arm-trusted-firmware.elf
after 500
con
after 2000
dow -data image.ub 0x8000000

常见问题

boot.src文件

boot.src 文件是一个包含启动指令的文本文件,用于在 U-Boot 环境中设置启动选项和执行启动操作。该文件通常包含一些环境变量设置、内存和设备初始化、加载内核映像和设备树文件等操作。

connfig文件启动地址信息相关配置:

1
2
3
4
5
6
7
8
9
10
11
12
13
14
15
16
17
18
19
20
21
22
23
24
25
26
27
28
29
30
#
# JTAG/DDR image offsets
#
CONFIG_SUBSYSTEM_UBOOT_DEVICETREE_OFFSET=0x100000
CONFIG_SUBSYSTEM_UBOOT_KERNEL_OFFSET=0x200000
CONFIG_SUBSYSTEM_UBOOT_RAMDISK_IMAGE_OFFSET=0x4000000
CONFIG_SUBSYSTEM_UBOOT_FIT_IMAGE_OFFSET=0x10000000

#
# QSPI/OSPI image offsets
#
CONFIG_SUBSYSTEM_UBOOT_QSPI_KERNEL_OFFSET=0xF00000
CONFIG_SUBSYSTEM_UBOOT_QSPI_KERNEL_SIZE=0x1D00000
CONFIG_SUBSYSTEM_UBOOT_QSPI_RAMDISK_OFFSET=0x4000000
CONFIG_SUBSYSTEM_UBOOT_QSPI_RAMDISK_SIZE=0x4000000
CONFIG_SUBSYSTEM_UBOOT_QSPI_FIT_IMAGE_OFFSET=0xF40000
CONFIG_SUBSYSTEM_UBOOT_QSPI_FIT_IMAGE_SIZE=0x6400000

#
# NAND image offsets
#
CONFIG_SUBSYSTEM_UBOOT_NAND_KERNEL_OFFSET=0x4100000
CONFIG_SUBSYSTEM_UBOOT_NAND_KERNEL_SIZE=0x3200000
CONFIG_SUBSYSTEM_UBOOT_NAND_RAMDISK_OFFSET=0x7800000
CONFIG_SUBSYSTEM_UBOOT_NAND_RAMDISK_SIZE=0x3200000
CONFIG_SUBSYSTEM_UBOOT_NAND_FIT_IMAGE_OFFSET=0x4180000
CONFIG_SUBSYSTEM_UBOOT_NAND_FIT_IMAGE_SIZE=0x6400000
CONFIG_SUBSYSTEM_UBOOT_KERNEL_IMAGE="Image"
CONFIG_SUBSYSTEM_UBOOT_FIT_IMAGE="image.ub"
# CONFIG_SUBSYSTEM_UBOOT_EXT_DTB is not set
1
2
3
4
5
6
7
8
9
10
11
12
13
14
15
16
17
18
19
20
21
22
23
24
25
26
27
28
29
30
31
32
33
34
35
36
37
38
39
40
41
42
43
44
45
46
47
48
49
50
51
52
53
54
55
56
57
58
59
60
61
62
63
64
65
66
'V\8i+M\9B\9E\F0\00\00	\E2\00\00\00\00\00\00\00\00\85w\9Cr\00Boot script\00\00\00\00\00\00\00\00\00\00\00\00\00\00\00\00\00\00\00\00\00\00\00	\DA\00\00\00\00# This is a boot script for U-Boot
# Generate boot.scr:
# mkimage -c none -A arm -T script -d boot.cmd.default boot.scr
#
################


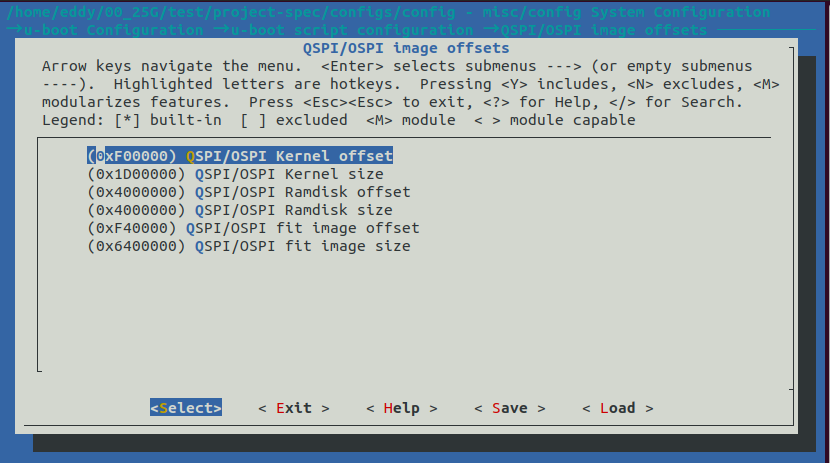
for boot_target in ${boot_targets};
do
echo "Trying to load boot images from ${boot_target}"
if test "${boot_target}" = "jtag" ; then
booti 0x00200000 0x04000000 0x00100000
fi
if test "${boot_target}" = "mmc0" || test "${boot_target}" = "mmc1" ; then
if test -e ${devtype} ${devnum}:${distro_bootpart} /uEnv.txt; then
fatload ${devtype} ${devnum}:${distro_bootpart} 0x00200000 uEnv.txt;
echo "Importing environment(uEnv.txt) from ${boot_target}..."
env import -t 0x00200000 $filesize
if test -n $uenvcmd; then
echo "Running uenvcmd ...";
run uenvcmd;
fi
fi
if test -e ${devtype} ${devnum}:${distro_bootpart} /image.ub; then
fatload ${devtype} ${devnum}:${distro_bootpart} 0x10000000 image.ub;
bootm 0x10000000;
fi
if test -e ${devtype} ${devnum}:${distro_bootpart} /Image; then
fatload ${devtype} ${devnum}:${distro_bootpart} 0x00200000 Image;;
fi
if test -e ${devtype} ${devnum}:${distro_bootpart} /system.dtb; then
fatload ${devtype} ${devnum}:${distro_bootpart} 0x00100000 system.dtb;
fi
if test -e ${devtype} ${devnum}:${distro_bootpart} /ramdisk.cpio.gz.u-boot && test "${skip_tinyramdisk}" != "yes"; then
fatload ${devtype} ${devnum}:${distro_bootpart} 0x04000000 ramdisk.cpio.gz.u-boot;
booti 0x00200000 0x04000000 0x00100000
fi
if test -e ${devtype} ${devnum}:${distro_bootpart} /rootfs.cpio.gz.u-boot && test "${skip_ramdisk}" != "yes"; then
fatload ${devtype} ${devnum}:${distro_bootpart} 0x04000000 rootfs.cpio.gz.u-boot;
booti 0x00200000 0x04000000 0x00100000
fi
booti 0x00200000 - 0x00100000
fi
if test "${boot_target}" = "xspi0" || test "${boot_target}" = "qspi" || test "${boot_target}" = "qspi0"; then
sf probe 0 0 0;
sf read 0x10000000 0xF40000 0x6400000
bootm 0x10000000;
echo "Booting using Fit image failed"

sf read 0x00200000 0xF00000 0x1D00000
sf read 0x04000000 0x4000000 0x4000000
booti 0x00200000 0x04000000 0x00100000;
echo "Booting using Separate images failed"
fi
if test "${boot_target}" = "nand" || test "${boot_target}" = "nand0"; then
nand info;
nand read 0x10000000 0x4180000 0x6400000
bootm 0x10000000;
echo "Booting using Fit image failed"

nand read 0x00200000 0x4100000 0x3200000
nand read 0x04000000 0x7800000 0x3200000
booti 0x00200000 0x04000000 0x00100000;
echo "Booting using Separate images failed"
fi
done

petalinux 2022.2编译工程,显示bitbake版本不兼容[2]

1
$PETALINUX/components/yocto/buildtools/sysroots/x86_64-petalinux-linux/usr/bin/python3 ./components/yocto/layers/core/scripts/contrib/convert-overrides.py ./project-spec/meta-user/

错误[5]

1
2
[   52.763091] alloc_netdev: Unable to allocate device with zero queues
[ 52.793075] xilinx_axienet: probe of a0010000.ethernet failed with error -12
1
2
3
4
5
6
7
8
25g-3-6$ petalinux-config --get-hw-description eth25g_wrapper.xsa
[INFO] Sourcing buildtools
INFO: Getting hardware description...
INFO: Renaming eth25g_wrapper.xsa to system.xsa
[INFO] Generating Kconfig for project
ERROR: Failed to generate /home/pdc/00-petalinux-workspace/25g-3-6/build/misc/config/Kconfig.syshw
ERROR: Failed to Kconfig project
ERROR: Failed to generate System hardware Kconfig file.

解决方法

1
sudo apt-get install libtinfo5

ERROR /dev

1
ERROR: There's no '/dev' on rootfs

ERROR: There’s no ‘/dev’ on rootfs (xilinx.com)

1
petalinux-config -> Image packaging configuration -> INITRAMFS/INITRD Image name -> petalinux-image-minimal

指定源码路径

1
2
set substitute-path <当前搜索路径> <指的搜索路径>
set substitute-path /usr/src/kernel /opt/linux-xlnx-xilinx-v2021.1

打包BOOT.BIN出现Section image.ub.0 offset of 0x242C0 overlaps with prior section end address of 242C0C0

1
2
3
4
5
6
***** Xilinx Bootgen v2021.1
**** Build date : May 28 2021-21:36:22
** Copyright 1986-2021 Xilinx, Inc. All Rights Reserved.

[ERROR] : Section image.ub.0 offset of 0x242C0 overlaps with prior section end address of 242C0C0
ERROR: Fail to create BOOT image

指定kerneloffset地址:

1
petalinux-package --boot --format BIN --kernel --offset 0x0242d000 --fsbl --u-boot --pmufw --fpga ./images/linux/design_1_wrapper.bit --force

qspi启动后无法自动跳转至kernel

1
2
3
4
#flash读取至ddr    目的地址   kernel源地址   长度
$zynqMP:sf read 0x80000000 0x0242d000 0x2800000

$zynqMP:booti 0x80000000

fit image

image-20230516202406387

在 Petalinux 配置中,QSPI/OSPI FIT 映像是指在 QSPI/OSPI NOR Flash 上存储的 FIT 映像。FIT 映像是一种灵活的引导映像格式,可以包含多个镜像文件(如内核、设备树、文件系统等),并且可以根据需要进行配置。

根据上述文件在uboot阶段可以使用以下代码启动kernel

1
2
$zynqMP:sf read 0x10000000 0xF40000 0x6400000
$zynqMP:bootm 0x10000000

如何修改设备树[3]

基于自动生成的设备树,添加或修改节点

通过修改./project-spec/meta-user/recipes-bsp/device-tree/files/system-user.dtsi,来实现对之前已经定义的设备树节点中的属性进行变更,也可以添加没有自动生成的设备树节点。

设备树语法可参考 《devicetree-specification.pdf》[4]

设备树更改完成后需要执行以下命令

1
2
3
4
petalinux-build -c device-tree -x cleansstate
生成pl.dtsi
petalinux-config -c device-tree
petalinux-build -c device-tree

设备树反编译

1
2
$ cd <plnx-proj-root>/images/linux/
../../build/tmp/sysroots-components/x86_64/dtc-native/usr/bin/dtc -I dtb -O dts -o system.dts system.dtb

手册

PG332 ERNIC 手册

PG203 CMAC 手册

PG210 25G AXI Ethernet 手册

PG021 AXI-DMA手册

PG288 MCDMA手册

UG1085-Zynq-Ultrascale-trm 手册 250 SoC芯片手册

Zynq UltraScale+ Devices Register Reference (xilinx.com) ug1085-Zynq-Ultrascale寄存器手册

UG1144 Petalinux Tools手册

错误

1
2
3
4
5
6
RROR: perftest-1.0-r0 do_compile: oe_runmake failed
ERROR: perftest-1.0-r0 do_compile: Execution of '/home/dpu/zjzhe/250soc_ernic/build/tmp/work/cortexa72-cortexa53-xilinx-linux/perftest/1.0-r0/temp/run.do_compile.180753' failed with exit code 1:
make all-am
make[1]: Entering directory '/home/dpu/zjzhe/250soc_ernic/build/tmp/work/cortexa72-cortexa53-xilinx-linux/perftest/1.0-r0/git'
make[1]: *** No rule to make target '../../../umm/1.0-r0/libumm.so', needed by 'libperftest.a'. Stop.

解决方法

1
2
3
4
5
6
dpu@dpu-PC:~/zjzhe/250soc_ernic/build/tmp/work/cortexa72-cortexa53-xilinx-linux/perftest/1.0-r0/git$ find ..// -name "libumm*"
..//recipe-sysroot/usr/lib/libumm.so.1.0
..//recipe-sysroot/usr/lib/libumm.so.1
..//recipe-sysroot/usr/lib/libumm.so
dpu@dpu-PC:~/zjzhe/250soc_ernic/build/tmp/work/cortexa72-cortexa53-xilinx-linux/perftest/1.0-r0$ ln -s ./recipe-sysroot/usr/lib/libumm.so ../../umm/1.0-r0/libumm.so

参考

中断(一):让 Linux 接收来自 PL 的自定义中断信号 (zynqnotes.com) zynqMP PL2PS、PS2PL设备树中断配置

主页 • 文档门户 (xilinx.com) Xlinx 文档下载

Xilinx/u-boot-xlnx: The official Xilinx u-boot repository (github.com) xlinx维护的uboot

Xilinx/linux-xlnx: The official Linux kernel from Xilinx (github.com) xlinx维护的linux

Petalinux2020.2 开发ZYNQ的AXI DMA - 知乎 (zhihu.com) petalinux创建modules

PetaLinux常用命令汇总 - schips - 博客园 (cnblogs.com)

petalinux-package qspi启动镜像的问题_uimage_offset_边城1987的博客-CSDN博客

petalinux-package –boot –add –offset doesn’t work as before (xilinx.com)


PetaLinux常用操作
http://example.com/2023/06/12/PetaLinux常用操作/
作者
Eddy
发布于
2023年6月12日
许可协议